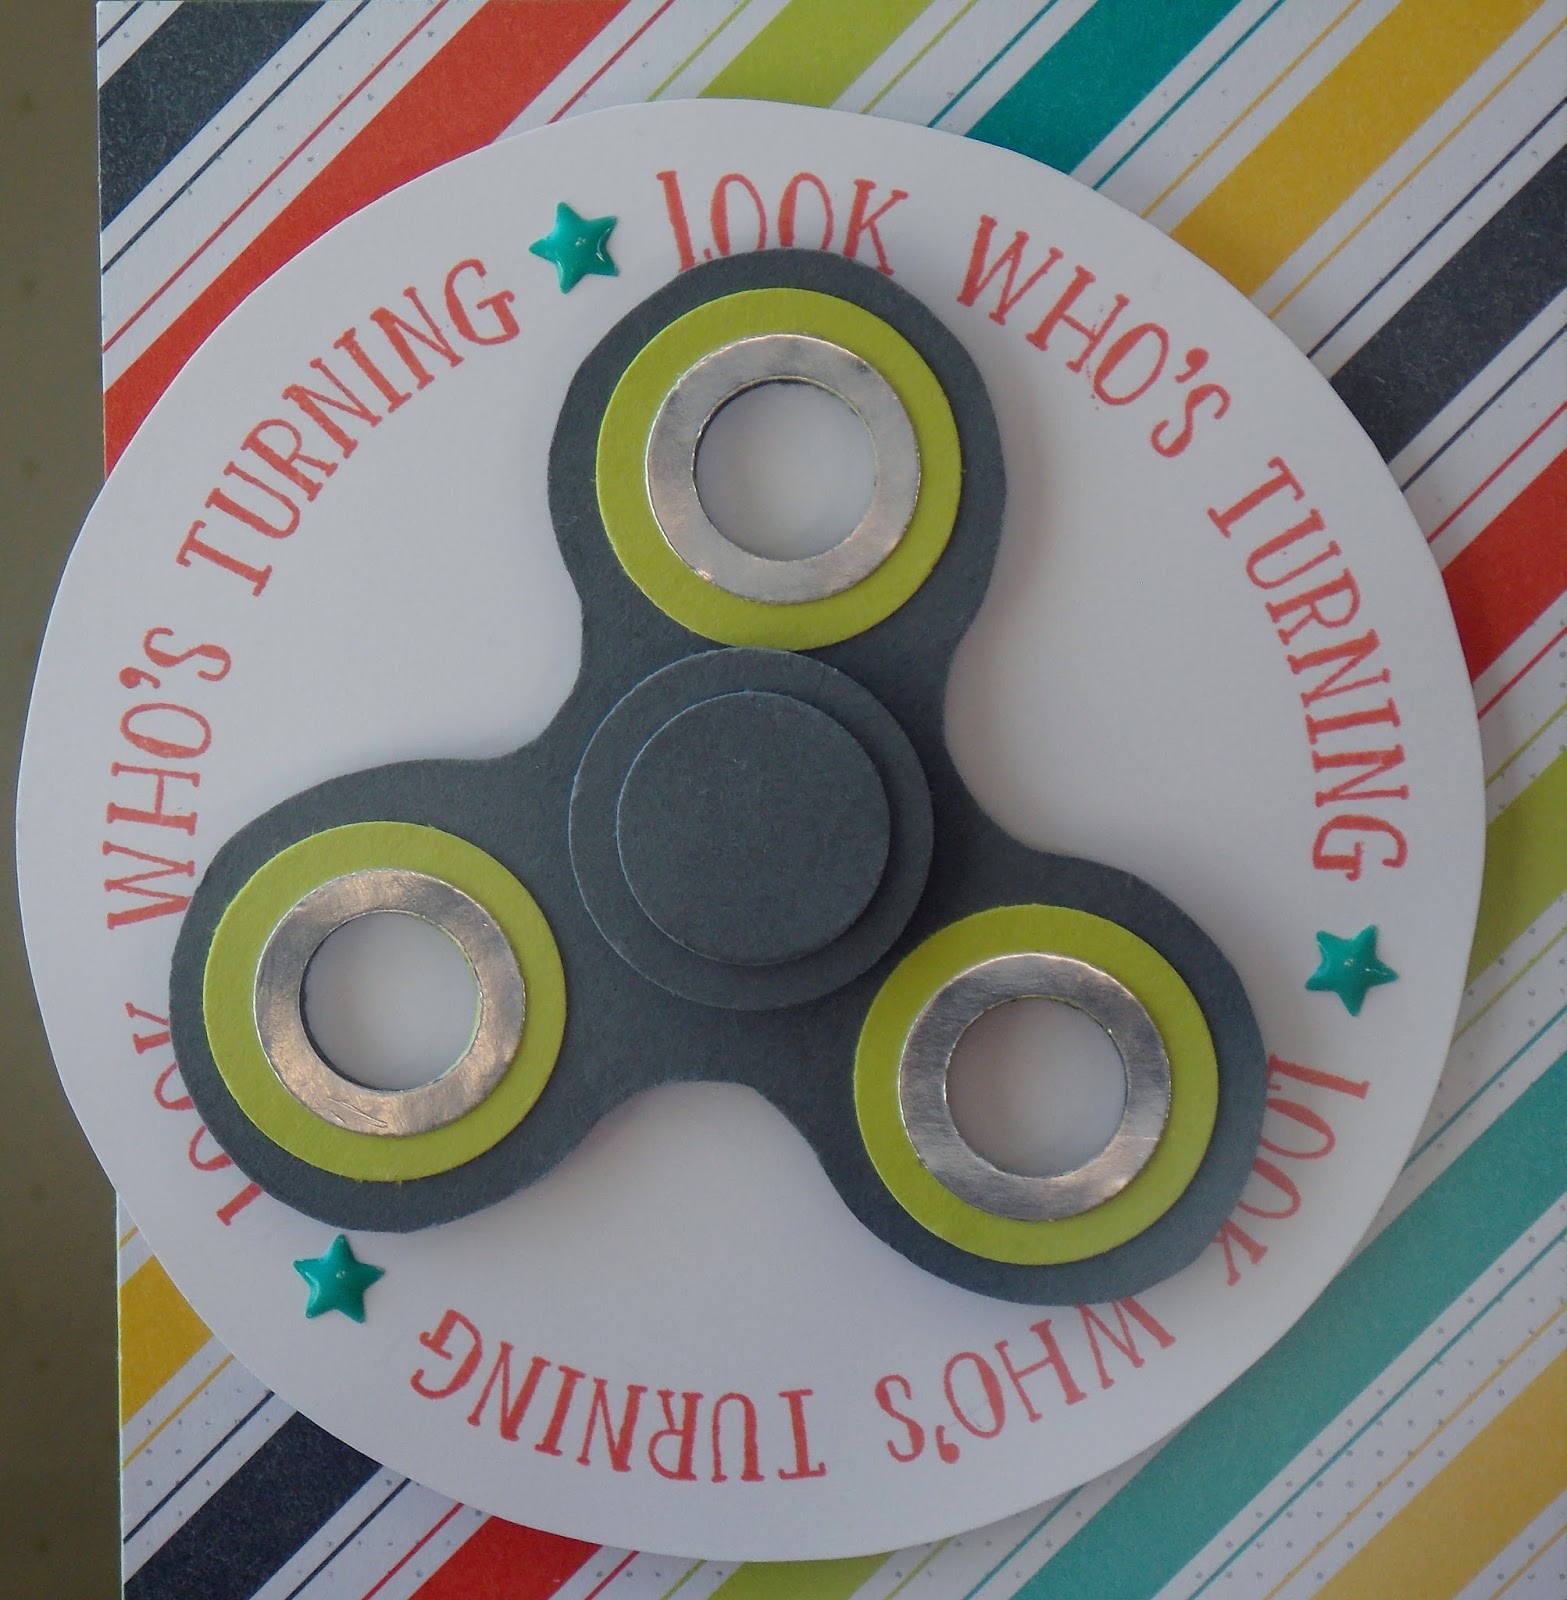
Hello there! Last week-end we celebrated our oldest grandson's birthday and I wanted to make Gabriel a fidget spinner card for his 12th!!! birthday. I watched several videos on youtube and I used bits and pieces from several of them. I should have taken pictures as I went while making Gabe's card, but as usual, I was making it at the last minute, so I re-created one today to give you step-by-step instructions. I started with a Lemon Lime Twist base and added a layer of SAB Bubbles & Fizz DSP. I didn't have a big enough circle in my Layering Circles Framelits, so I traced around a large mug & cut it out with Paper Snips. I stamped the sentiment with Calypso Coral ink using the Number of Years set.

For the fidget spinner, I bought a cheap one at Wal-Mart and traced around it onto a piece of Basic Grey Cardstock. You may need an extra pair of hands, as it's not that easy to trace around, or you could maybe anchor it in place with Dimensionals? I cut it out with Paper Snips. Next, I punched 3 rings from a Silver Foil Sheet. I punched out the center first with a 1/2" Circle Punch. I then centered a 3/4" Circle Punch around it and punched it out.
I then punched 3 circles in a strip of Lemon Lime Twist Cardstock, keeping some room around each, using the 1/2" Circle Punch. I glued a silver ring around each using Liquid Tombow .
Then I punched it out with a 1" Circle Punch. Repeat for all 3 rings.
I centered one of the rings on one end and traced the center with a pencil.
I lined up the 1/2" Circle Punch with the pencil circle and punched out the center. I then glued the ring on using Liquid Tombow. Repeat this process for all 3 ends of the fidget spinner.
Next, I punched a circle from Basic Grey Cardstock using the 3/4" Circle Punch. I centered it in the middle of the fidget spinner and traced around it with a pencil. I then punched it out with the 3/4" Circle Punch.
You'll need to make the hole smaller in the center of the fidget spinner, so you'll need to make another ring. Punch out a circle using the 1/2" Circle Punch-it doesn't matter what color as it won't show. Then center the 1" Circle Punch over it and punch it out. Glue this to the back side of the center circle using Liquid Tombow.
Next, I placed a Dimensional in the center of a penny and laid the fidget spinner on top of it.
Add another penny on top of the Dimensional and gently squeeze them together.
I put a Glue Dot on the bottom penny and centered it on the white circle.
I attached a 1" Basic Grey circle to the top penny with a Glue Dot, and then added a 3/4" circle on top with a Dimensional.
I attached the Whisper White circle to the card base with Dimensionals and added 3 Brights Enamel Shapes.
I finished it off with Myths & Magic and Tutti-fruitti Washi Tape.
For the inside I mounted a piece of Whisper White Cardstock to a coordinating design of Bubbles & Fizz DSP. I cut out the numbers with the Large Letters Framelits from Calypso Coral Cardstock and adhered with Glue Dots.
I'm happy to report he thought the card was pretty cool:)
It's hard to believe our little buddy is 12 already!
We're taking a road trip to Coralville next week-end to take him out to lunch and then shopping at American Eagle. Gonna be a fun day with our buddy and I can't wait!
I hope you'll give this fun interactive card a try! Thanks so much for stopping by:)


No comments:
Post a Comment