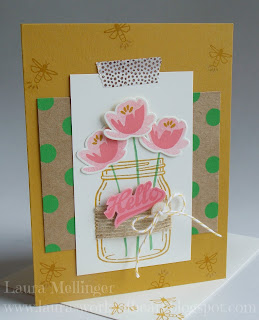
Hello there! Back with one more card made with the Jar of Love/Everyday Jars Bundle. I started with a Delightful Dijon base and stamped the background with the same ink. I added a piece of retired specialty DSP on top. I stamped the jar image with Delightful Dijon onto Very Vanilla Cardstock.
I stamped the stems with Cucumber Crush ink and the flowers with Flirty Flamingo, stamping off once for the lighter shade. I cut them out with the Everyday Jars Framelits, along with the help of the Big Shot. I adhered the top flower with a Dimensional, and added a piece of Affectionately Yours Washi Tape.
I stamped the sentiment with Flirty Flamingo ink onto the same color cardstock and cut it out with my Paper Snips. I added a piece of Burlap Ribbon to the jar and attached the sentiment above it with a Dimensional. I added a piece of Crushed Curry Baker's Twine through a Classy Designer Button and tied a bow. For a fun finishing touch, I went over the fireflies ends with a Clear Wink of Stella Glitter Pen to add a little shine:)
The wood-mount option for this bundle is $52, which earns you a Bonus Days Coupon worth $5 to redeem in August. Remember any $50 purchase earns you a coupon, but the promotion ends tonight. Check back through the older posts to get more ideas of uses for this bundle, and check out the Thoughtful Branches Bundle which will be available August 2nd. Thanks so much for stopping by!
Sunday, July 31, 2016
Saturday, July 30, 2016
JAR OF LOVE CARD:
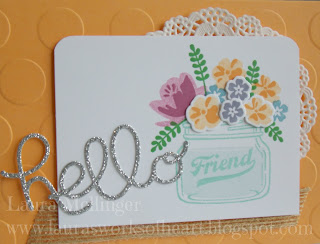
Hello there! I wanted to share a card made with the Jar of Love Bundle, one of the most popular products in the new catalog. I used the set Jar of Love and coordinating Everyday Jars Framelits. I started with a Peekaboo Peach base and ran it through the Big Shot using the Large Polka Dot Embossing Folder. I then attached a Delicate White Doily with SNAIL to the base. I added a piece of Whisper White Cardstock on top and rounded the top corners with the Project Life Corner Rounder Punch.
I stamped the jar and sentiment with Pool Party ink and used Soft Sky for the water. I stamped the flowers in Sweet Sugarplum, stamping off once for the lighter shade and repeated the same process for the Peekaboo Peach flowers. I stamped the small flowers in Marina Mist and Wisteria Wonder ink. The stems were stamped with Cucumber Crush ink. I used the Everyday Jar Framelits to cut out the flowers, and adhered with Glue Dots.
I added a piece of Burlap Ribbon to the base with SNAIL and attached the Whisper White layer with Dimensionals, placing them above the ribbon to keep the cardstock flush. I used the Hello You Thinlits to cut out the sentiment using Silver Glimmer Paper and attached with Liquid Tombow.
I found the idea for this card on the current catalog cover and made a few changes. Unfortunately I haven't had time to come up with my own ideas lately, so I'm happy to have so many ideas from the SU! artists to share:) This is another option for you to order to be able to get in on a Bonus Days Coupon. Tomorrow is the last day to earn your Bonus Bucks, so make to stop back for 1 more idea to make with the Bundle and take advantage of the $5 coupon that you can redeem in August. Thanks so much for stopping by!
Thursday, July 28, 2016
CONFETTI CELEBRATION CARD #2:
Hello there! Back today with another fun idea using the Confetti Celebration set found in the new catalog. I started with a Pool Party base and stamped the balloons with Bermuda Bay ink. I added a layer of Daffodil Delight and stamped the star background with the same ink. On top of that I added a Calypso Coral layer stamped with the same ink.
On top of that I added a layer of Whisper White and stamped the sentiment with Bermuda Bay ink. I adhered the Daffodil piece to the base with SNAIL and added a swirl of Bermuda Bay Baker's Twine to the back of the Calypso piece with Glue Dots. I then adhered it to the base with Dimensionals.
I adhered the sentiment with Dimensionals as well and added a few Metallic Sequins with the Fine-Tip Glue Pen.
Another fun, quick & easy card to put together. I'm off to make a bunch more:) Thanks so much for stopping by!
Monday, July 25, 2016
CONFETTI CELEBRATION CARD:
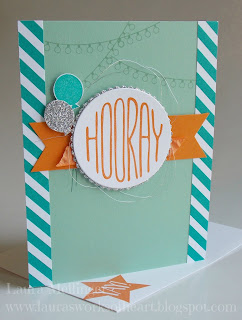
Hello there! When I came across the set Confetti Celebration in the new SU! catalog I told myself I didn't need another birthday set, but darn them!, they came up with a lot of awesome samples, so I caved! I found this on the SU! site and had to make some. I started with a Mint Macaron base and stamped the lights with the same ink. I added strips of DSP to the sides from the Brights DSP Stack.
I stamped the sentiment with Pumpkin Pie ink onto Whisper White Cardstock. I used the amazing Layering Circles Framelits to cut out the sentiment and a scalloped circle made from Silver Glimmer Paper. I really love these framelits. You get 16 dies and lots of different sizes of scalloped circles to layer with. And they're such an improvement from the dated scallop punches which retired. I added a swirl of Silver Metallic Thread and attached it to the back using Glue Dots.
I ran a piece of Pumpkin Pie Cardstock through the Banner Triple Punch on both ends and layered a piece of Peekaboo Peach Ruched Ribbon on top. I used a Sponge Dauber with Pumpkin Pie ink over the ribbon to match the Pumpkin Pie. I stamped the 2 balloons to the side using Mint Macaron ink. I adhered the Pumpkin Pie piece to the card front with SNAIL, and attached the ribbon on top with Glue Dots.
I stamped one of the balloons with Bermuda Bay ink onto Whisper White Cardstock and cut it out with my Paper Snips. I then traced the balloon onto the back of a piece of Silver Glimmer Paper and cut it out as well. I attached both balloons with Dimensionals. Such a fun card to use for so many occasions. Check back as I'll be sharing some more ideas for this fun set. This is a great way for you to earn a Bonus Days Coupon! Purchase the Confetti Celebration set and the Layering Circles Framelits used to make this card, and get a coupon to save $5 on an order in August:) Stay tuned for some more ideas. Thanks so much for stopping by!
Sunday, July 24, 2016
THOUGHTFUL BRANCHES CARD #4:
Hello there! Back with 1 more idea to share using the Thoughtful Branches/Beautiful Branches Bundle. I found this on the SU! site as well but substitued some of the colors. We have 50 colors to work with and SU! tends to use about 6 of them, lol. I started with a Wild Wasabi base~a lovely, much-neglected green, and stamped the background with it as well. I stamped the tree image with Wild Wasabi ink several times, stamping off as well, onto a piece of Whisper White Cardstock. I stamped the trunk with Soft Suede ink.
I stamped the sentiment with Watermelon Wonder ink onto Whisper White Cardstock. I added a longer length underneath, flagged the ends, and adhered with Dimensionals. I added some Affectionately Yours Washi Tape, and attached the sentiment over the top with SNAIL. I stamped the birds with Pool Party ink and cut them out with the coordinating thinlits. I attached them with Dimensional pieces and stamped the grass with Wild Wasabi ink.
I added a piece of Vellum Cardstock underneath the Whisper White Cardstock and adhered to the card base. I wrapped a piece of Crushed Curry Baker's Twine around the card and tied a bow.
Hopefully you got lots of ideas for what to make with this amazing bundle. I'll be posting some ideas for projects that you can make with other stamp sets from the annual catalog to earn some Bonus Bucks to get extra savings on the Thoughtful Branches/Beautiful Branches Bundle. Check back:) Thanks so much for stopping by!
Saturday, July 23, 2016
THOUGHTFUL BRANCHES CARD #3:
Hello there! Today it's Christmas in July. Too soon? Never...especially when you make your own Christmas cards:) I got the inspiration for this card off of the SU! site again but made a few changes. I started with a Very Vanilla base and added another layer on top. Again, I used the Thoughtful Branches/Beautiful Branches Bundle to make this card. I stamped the background trees and snow with Versamark and then directly into Crumb Cake ink. I then heat-embossed them with White Embossing Powder. Dang it! I wish I would have used the Softly Falling Embossing Folder for this! I'll have to make a note to remember to do that with the rest that I make.
Next I cut out a Very Vanilla tree using the Big Shot and coordinating Beautiful Branches Thinlits. I added some shimmer with the Clear Wink of Stella Glitter Brush. I stamped the birds with Real Red ink and used the thinlits to cut them out as well.
I used the Christmas set Oh What Fun for the sentiment using Crumb Cake ink and flagged one side. I attached the Vanilla layer to the base with Dimensionals and attached the tree with Glue Dots.
I attached the sentiment and birds with Dimensionals as well. I'm pretty excited that I have a jump start on my Christmas cards:) This card was pretty simple and I think you could knock out a bunch of these quickly. Remember this bundle isn't available until August 2nd, and then only available until August 31st. It's a 22 piece photopolymer set which sells for $27. The thinlits are $31, but if you get the bundle it's $52, saving you $6 if you buy them together. And you can save even more if you place a $50 order by July 31 and earn a Bonus Days Coupon worth $5 to redeem in August. Email me at lmel09@q.com or go to www.lauramellinger.stampinup.net for more details. Thanks so much for stopping by:)
Friday, July 22, 2016
THOUGHTFUL BRANCHES CARD #2:
Hello there! Back with another beauty I found on the SU! site using the Thoughtful Branches/Beautiful Branches Bundle. This is such a versatile set and can be used for so many occasions. I started out with a Sahara Sand base and on top of that I added a layer of Watercolor Paper. I stamped the card all over with the leaf design using VersaMark ink and heat-embossed it with White Embossing Powder. I then went over the Watercolor Paper with an AquaPainter, or you could use a paintbrush and water. Next, I added a couple drops of Daffodil Delight ink into a container and a few drops of water to wash the center of the paper. I then added some Pumpkin Pie ink around the edges and blended. I emptied most of the water out of the AquaPainter and added a couple drops of Pumpkin Pie ink, shook it good and added the ink spatter by tapping the AquaPainter on my index finger.
I set that aside to dry and cut out the leaves using the Beautiful Branches Framelits & Big Shot with Sahara Sand Cardstock. Next I stamped the sentiment with Whisper White Craft ink onto Watermelon Wonder Cardstock and heat-embossed it with White Embossing Powder. I used the Layering Circles Framelits to cut it out. I added a swirl of Gold Metallic Thread to the back and secured with a few Glue Dots.
Once the Watercolor Paper had dried, I stamped the leaf image 3 times with Basic Grey Archival ink. I folded a length of Watermelon Wonder Mini Striped Ribbon on one end, securing it with Fast Fuse and attached it to the card base with Fast Fuse as well. I used it again to add the layer of Peekaboo Peach Ruched Ribbon on top. I attached the sentiment with Dimensionals and added the leaves with Glue Dots.
I'm not the best watercolorer in the world but using the Watercolor Paper really helps. I'm off to make 7 more of these, so I'll definitely get some practice in!

Remember the Thoughtful Branches/Beautiful Branches Bundle is only available for a limited-time. It will only be available August 2nd through August 31st. You can save $5 or more on this bundle by earning Bonus Bucks through the end of July. For every $50 you spend in July, you get a $5 Bonus Buck coupon which you can redeem in August. There's no limit to how many coupons you can earn, and no limit to how many you can redeem on your August purchase! See more details on my online store at: www.lauramellinger.stampinup.net.
I set that aside to dry and cut out the leaves using the Beautiful Branches Framelits & Big Shot with Sahara Sand Cardstock. Next I stamped the sentiment with Whisper White Craft ink onto Watermelon Wonder Cardstock and heat-embossed it with White Embossing Powder. I used the Layering Circles Framelits to cut it out. I added a swirl of Gold Metallic Thread to the back and secured with a few Glue Dots.
Once the Watercolor Paper had dried, I stamped the leaf image 3 times with Basic Grey Archival ink. I folded a length of Watermelon Wonder Mini Striped Ribbon on one end, securing it with Fast Fuse and attached it to the card base with Fast Fuse as well. I used it again to add the layer of Peekaboo Peach Ruched Ribbon on top. I attached the sentiment with Dimensionals and added the leaves with Glue Dots.
I'm not the best watercolorer in the world but using the Watercolor Paper really helps. I'm off to make 7 more of these, so I'll definitely get some practice in!

Remember the Thoughtful Branches/Beautiful Branches Bundle is only available for a limited-time. It will only be available August 2nd through August 31st. You can save $5 or more on this bundle by earning Bonus Bucks through the end of July. For every $50 you spend in July, you get a $5 Bonus Buck coupon which you can redeem in August. There's no limit to how many coupons you can earn, and no limit to how many you can redeem on your August purchase! See more details on my online store at: www.lauramellinger.stampinup.net.
Make sure to stop back for more fun ideas using this bundle. Thanks so much for stopping by:)
Thursday, July 21, 2016
THOUGHTFUL BRANCHES CARD:
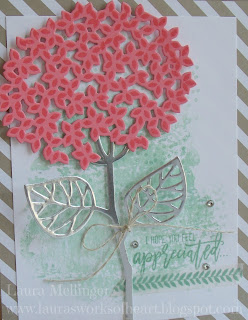
Hello there! As promised I'm back with a card made from the Thoughtful Branches Bundle that I got yesterday. It is amazing and I have seen several gorgeous samples that I will be sharing with you. For this card I started with a Crumb Cake base and added a layer of DSP from the Neutrals DSP Stack. On top of that I added a layer of Whisper White Cardstock that I watercolored a Mint Macaron background on using the Watercolor Wash Background Stamp. I simply used the corner of the stamp pad to get a little ink on the center of the stamp, and added some water with a paintbrush directly on the stamp. I then stamped off the dot image and stamped it randomly.
I stamped the floral image with Flirty Flamingo ink onto the same cardstock~gotta say I am loving this new In Color:) I then ran it through the Big Shot using the coordinating Beautiful Branches Framelits. I then cut out the stem using a piece of a Silver Foil Sheet. I then wrapped a piece of Linen Thread around the stem and tied a bow.
I attached the floral and stem pieces with Glue Dots and stamped the sentiment with Mint Macaron ink. I tucked a piece of Affectionately Yours Washi Tape underneath and added a few Basic Rhinestone Jewels.
This card came together really quickly thank goodness, as I'm off to make several more to send to Bella Luna, a fun new boutique my sister just opened up yesterday in Salem, Virginia. I'll be back with many more ideas for this bundle so check back! Thanks so much for stopping by:)
Tuesday, July 19, 2016
JAR OF LOVE CARD:
Hello there! I couldn't wait to share this lovely card made with the Jar of Love/Everyday Jars Bundle. I found it on the SU! site and had to make it. Actually I made 8 of them. My sister is opening a boutique in Virginia and wanted to put our cards and candles in it, so we've been busy getting them ready. We're going to put our website on hold for now and see how things go. I started with a Flirty Flamingo base, one of the new In Colors, in case you're not familiar with it yet. I ran it through the Big Shot using the Woodgrain Embossing Folder. On top of that I added a layer of Whisper White Cardstock and stamped it 3 times with one of the greenery images using Mint Macaron ink.
I made the larger flowers with Peekaboo Peach, stamped off for the base, and used full strength for the centers. I did the same with the smaller flowers using Flirty Flamingo ink. I used Mint Macaron for the stamens~is that what they're called? I stamped the stems with Mint Macaron & Emerald Envy, another new In Color, and cut them all out with the Everyday Jars Framelits. I positioned them where I wanted them and adhered with Liquid Tombow. I added the flowers with Dimensionals.
The original card had 'congrats' on the front, but I didn't have the set they used or a good alternative, so I put it on the inside, and used the retired set Bravo for the sentiment. I stamped it with Whisper White Craft ink onto Crumb Cake Cardstock, and heat-embossed it with White Embossing Powder. I used the Banner Triple Punch to notch out the sides. I also didn't have the 1/8" Gold Ribbon that they used, so I substituted the retired Soft Sky. I adhered the ends of the ribbon to the back of the white cardstock with SNAIL and added a bow with a Glue Got. I attached a piece of one of the new Delicate White Doilies to the back of the sentiment and attached with Dimensionals.
I fell in love with this sweet romantic card as soon as I saw it, and I hope my sister will be happy to be getting some of these for her new shop. This is such a fun bundle to work with and one of my favorites from the new catalog...one of many unfortunately:) I'm so excited to be getting another fun bundle tomorrow called Thoughtful Branches. Stay tuned as I'll be sharing some projects made with this limited-time offer. Thanks so much for stopping by:)
Friday, July 15, 2016
WILD ABOUT FLOWERS CARD:
Hello there! I needed a Retirement card, so I was happy to break out the set Wild About Flowers. And I figured I'd make 8 of them while I was at it. I pretty much CASED this from the catalog, with a few upgrades. I started with a Whisper White base and added another layer on top. I seem to have issues with a watercolor background. I've watched many videos and it looks so easy, but I can never get it to look the way I want. After wasting a whole sheet of cardstock, I moved to Plan B. I put the Watercolor Wash Background Stamp to work by stamping the Pool Party Stamp Pad directly to the center of the stamp. I added several drops of water to the stamp and moved it around with a brush, getting the background shape I wanted. It worked out really well and was able to get 8 card fronts to look pretty much the same.
Next, I inked the darkest stem image with Old Olive ink, and then stamped off with it again to the left. I used another stem image and stamped off before stamping it to the base. I then used Sweet Sugarplum for the lighter flowers, and Rick Razzleberry for the darker ones. I stamped the sentiment in Rich Razzleberry as well. I used the Clear Wink of Stella Glitter Brush to add a little sparkle and dimension to the flowers. I then ran a piece of Playful Palette Washi Tape below the sentiment and added a piece of Burlap Ribbon overlapping it.
I then thread a retired button with a piece of Gold Cording~not sure if it will carry over to the Holiday Catalog or not? I'll find out in a couple of weeks:) I attached it with a Dimensional piece at the top and Glue Dots at the bottom of the button. I then added a few sequins left over from last month's Paper Pumpkin with the Fine-Tip Glue Pen.
This ended up being a little more time-consuming (don't they all?) than I thought it would be, but I was still able to knock out 8 of them last evening. So happy to finally get some ink on this set. Thanks so much for stopping by:)
Friday, July 8, 2016
READY TO POP HOSTESS GIFT:
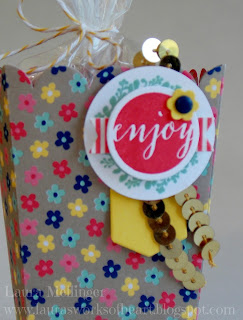
Hello there! I'm so excited to share this fun little popcorn box with you made with the Ready To Pop/Popcorn Box Thinlits Bundle. And when I say little, it's itty-bitty adorable, yet it holds 25 malted milk balls! It truly is the perfect size:)
I made the popborn box out of the new Affectionately Yours DSP. To assemble the box, I used tear & Tape on the tabs, folding the overhang onto the tape with my finger. I stamped the sentiment with Watermelon Wonder ink onto Whisper White Cardstock and cut it out using one of the dies included. The wreath was stamped with Mint Macaron and punched out with a 1 3/4" Circle Punch. I added a piece of the coordinating Affectionately Yours Washi Tape to a piece of Whisper White Cardstock and cut the banner shape out with another of the dies included in the Bundle.
I cut the bottom piece from Daffodil Delight Cardstock using another coordinating die from the Bundle and stapled it to the box, with a piece of Gold Sequin Trim on top. I adhered all the layers on top of each other with Dimensionals in between.
I used the Tree Builder Punch to make the flower and added a Regals Candy Dot to the center. I stuffed a cello bag inside and filled it with malted milk balls and tied it shut with Crushed Curry Baker's Twine. I hope my Hostess enjoys this sweet little treat:)
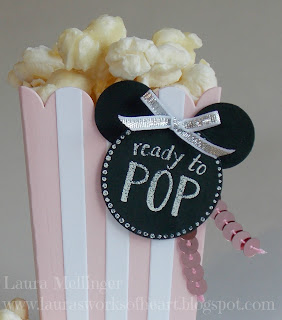
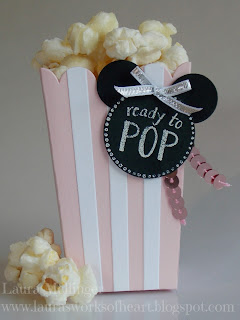
My daughter is planning a Minnie Mouse baby shower for a friend, and I thought this would make an adorable favor for everyone attending. I made the box using Pink Pirouette Cardstock and added Whisper White stripes using another die included in the Bundle.
I used the coordinating stamp set Ready To Pop and stamped the images with Whisper White Craft ink onto Basic Black Cardstock, and heat-embossed them with White Embossing Powder and the Heat Tool. I used the 1 3/8" Circle Punch to punch the circle out and used the 3/4" Circle Punch for the ears.
I added a bow made with the Silver 1/8" Ribbon and a piece of Blushing Bride Sequin Trim, and attached both with a Glue Dot.
Hopefully this prototype will fly with Olivia and we'll knock out 40 more for the shower. I can't wait to play with this bundle some more and come up with lots more adorable tiny treats:)
*Promotion Period: July 7-31, 2016
*Redemption Period: August 2-31, 2016
*An email address is required to participate in this promotion; Bonus Days coupon codes can only be delivered via email.
*It is strongly recommended that participants both save emails that contain their Bonus Days coupon codes AND write down the coupon codes in a safe place. Codes CANNOT be resent if the email is lost, and lost codes CANNOT be recovered.
*Bonus Days coupon codes can be redeemed for any product excluding Starter Kits and Paper Pumpkin subscriptions. New prepaid Paper Pumpkin codes can be redeemed.
*There is no limit to how many Bonus Days coupons participants can receive and there is no limit to how many coupons can be used during the Redemption Period.

You can get this exclusive, limited-time Thoughtful Branches Bundle between August 2-31, while supplies last. This limited-time bundle is only available in August, and you can use your Bonus Days coupons to get this set/bundle at a discount! See more details at www.lauramellinger.stampinup.net. Thanks so much for stopping by!
Subscribe to:
Posts (Atom)


